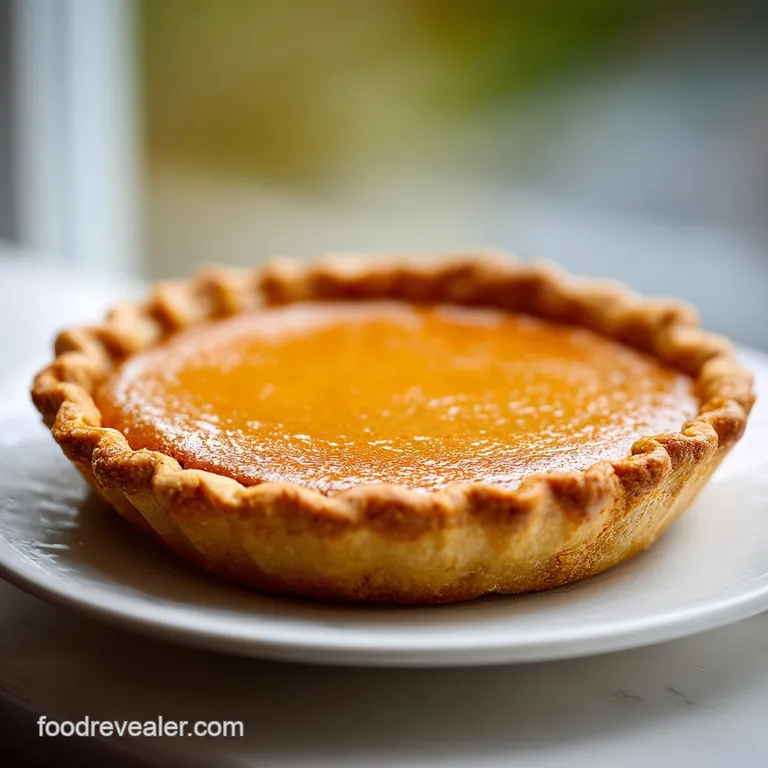
The Ultimate Silky-Smooth Pumpkin Pie
- Time: Active 30 minutes, Passive 75 minutes, Total 105 minutes
- Flavor/Texture Hook: A velvety, spiced custard inside a shattering, buttery pastry
- Perfect for: Stress free holiday hosting or beginner bakers
- A Flawless Homemade Pumpkin Pie Recipe
- Techniques for a Velvety Filling
- Essential Numbers for Baking Success
- Deep Dive into Key Components
- Tools for a Stress Free Bake
- Detailed Steps to Golden Perfection
- Solving Common Pastry Problems
- Smart Swaps and Flavor Twists
- Scaling Success
- Keeping Your Slices Fresh Longer
- Garnish Ideas for Style
- Myths About Pumpkin Pie
- Recipe FAQs
- 📝 Recipe Card
A Flawless Homemade Pumpkin Pie Recipe
The very first time I tried to make a pie for a family dinner, it was a literal disaster. I followed a generic label on a can, threw everything into a raw crust, and hoped for the best. What came out was a sad, greyish orange puddle with a crust that had the texture of wet cardboard.
I was so embarrassed I tried to hide it behind the mashed potatoes. Since then, I've spent years figuring out what actually makes the difference between a "fine" pie and one that people actually talk about for weeks. It’s all about managing moisture and waking up those sleepy spices.
When you walk into the kitchen and smell the cinnamon, ginger, and nutmeg hitting a hot pan, you know you're doing something right. That sizzle of the pumpkin puree as it hits the saucepan isn't just a sound; it's the smell of the water evaporating and the sugars caramelizing.
It transforms the puree from a bland vegetable mash into a deep, concentrated base for the custard. This isn't just another dessert; it's the result of learning from every cracked top and soggy base I've ever made.
We are going to treat this bake with the respect it deserves, but without the unnecessary fuss. You don't need a pantry full of specialized powders or a degree in pastry arts. What you need is a little bit of patience and the willingness to let your stove do some of the heavy lifting before the oven even turns on.
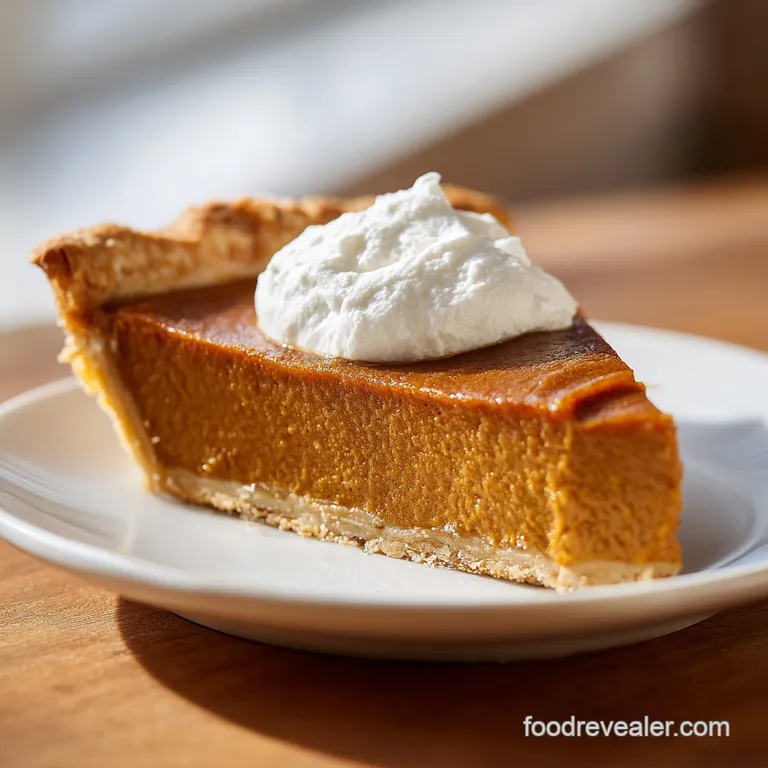
We're aiming for that specific moment when the fork hits the crust and you hear a distinct "shatter," followed by the smooth slide into a filling that feels like silk.
Techniques for a Velvety Filling
Moisture Control: Sautéing the pumpkin puree for 5 minutes removes excess water that otherwise prevents the custard from setting firmly.
Spice Activation: Heating the aromatics in the puree releases fat soluble oils that stay dormant when just mixed cold.
The Moisture Barrier: Brushing the pre baked crust with egg white creates a waterproof seal that keeps the pastry crisp under the wet filling.
Gentle Coagulation: Tempering the eggs by adding hot liquid slowly prevents them from scrambling, ensuring a smooth texture without lumps.
| Method | Time | Texture | Best For |
|---|---|---|---|
| Stovetop Bloom | 5 mins | Concentrated, deep flavor | Maximum spice impact |
| Traditional Mix | 1 min | Lighter, more vegetal | Last minute quick bakes |
| Slow Reduction | 15 mins | Jam like, very dense | Ultra premium gourmet style |
Using the stovetop method is a secret I learned from a pastry chef friend who noticed most home cooks just dump and stir. By taking those five minutes to heat the puree, you're essentially toasted the spices and reducing the pumpkin down.
This is the difference between a pie that tastes like "pumpkin spice" and one that tastes like real, deep pumpkin. It’s a small step, but it’s the one that people notice the most when they take that first bite.
Essential Numbers for Baking Success
Cooking is an art, but baking is a game of precision, especially when it comes to custards. If the oven is too hot, the eggs in the filling will expand too quickly and then collapse, leaving you with a Grand Canyon sized crack right down the middle.
If it’s too cool, you’ll be waiting forever and the crust might lose its structure before the middle sets. I've found that the 325°F (165°C) mark is the sweet spot for that final bake.
| Component | Science Role | Pro Secret |
|---|---|---|
| Pumpkin Puree | Provides body and fiber | Sauté it to remove the "canned" tinny aftertaste |
| Evaporated Milk | Adds creaminess without excess water | Use low-fat to keep the custard light but stable |
| Maple Syrup | Sweetener and moisture | Use Grade A Dark for a more complex caramel note |
When we talk about the crust, the 315g of flour needs to be handled gently. Overworking it develops gluten, which turns your "shatter" into a "chew." I always tell people to look for those pea sized bits of butter in the dough. Those are little steam pockets waiting to happen. If you want to see how this pastry technique compares to other classics, my Classic Dutch Apple Pie uses a similar philosophy for the base, though the topping is a different beast entirely.
Deep Dive into Key Components
Let's talk about the pumpkin for a second. We are using 425g of pumpkin puree here not pumpkin pie filling. The filling in the can already has sugar and spices, and it's usually not the high-quality stuff. By using plain puree, we control the narrative.
The 160ml of maple syrup provides a much more sophisticated sweetness than white sugar ever could. It has those woody, earthy undertones that play so well with the 2 tsp of ground cinnamon and the 0.5 tsp of ground cloves.
The eggs are the glue that holds our masterpiece together. We’re using 3 large eggs plus 1 large egg yolk. That extra yolk is a little trick for richness. It adds fat and lecithin, which helps the 354ml of low-fat evaporated milk emulsify with the pumpkin. Don't worry about it being "low-fat"; the custard gets plenty of body from the eggs and the starch in the pumpkin. If you're looking for a different kind of orange hued comfort, you might find my Roasted Sweet Potato Casserole interesting, as it uses pecans to contrast the soft mash in a similar way.
Chef's Tip: Add a literal pinch of black pepper to your spice mix. It doesn't make the pie spicy, but it acts like a volume knob for the ginger and cloves, making the flavors pop.
Tools for a Stress Free Bake
You don't need a professional kitchen to pull this off, but a few specific tools make the 30 minutes of prep much easier. A food processor is my go to for the crust because it keeps the 225g of unsalted butter cold.
If you use your hands, the heat from your palms can melt the butter before it even hits the oven. If you don't have a processor, a pastry cutter or even two forks will work just move fast.
For the filling, a heavy bottomed saucepan is better than a thin one. You’re sautéing that puree over medium heat, and thin pans have hot spots that can scorch the pumpkin. A whisk is essential for the 354ml of evaporated milk to ensure there are no streaks of syrup or spice.
Finally, a 9 inch deep dish pie plate is non negotiable. This recipe makes a generous amount of custard, and a standard shallow tin just won't hold it all without a mess.
Detailed Steps to Golden Perfection
- Pulse 315g flour, 5g salt, and 12g coconut sugar in a food processor. Add 225g chilled butter cubes and pulse until pea sized crumbs form. Note: These butter chunks create the flaky layers.
- Gradually add 60ml ice water until the dough just holds together. Wrap and chill for 1 hour to relax the gluten.
- Roll out the dough on a floured surface and fit into a 9 inch deep dish plate. Blind bake with weights at 375°F (190°C) for 15 minutes.
- Remove weights, brush with a thin layer of egg white, and bake for 5 more minutes until the base looks dry and matte.
- In a saucepan over medium heat, stir 425g pumpkin puree with cinnamon, ginger, nutmeg, cloves, and pepper for 5 minutes until it smells like a candle shop.
- Whisk in 160ml maple syrup and 354ml low-fat evaporated milk until the mixture is a uniform rust orange color.
- Beat the 3 eggs and 1 yolk in a bowl. Slowly pour one ladle of the warm pumpkin into the eggs while whisking constantly.
- Pour the tempered egg mixture back into the saucepan with the rest of the pumpkin and stir well.
- Pour the custard into the crust and bake at 325°F (165°C) for 50-60 minutes until the edges are set but the center still wobbles.
- Cool on a wire rack for 4 hours. Do not cut early or the custard will weep and lose its silky texture.
Solving Common Pastry Problems
Why Your Crust Is Soggy
This usually happens because the moisture from the filling seeps into the raw dough before it can crisp up. It’s why we do the blind bake and the egg white seal. If you skip the seal, the liquid in the 425g of pumpkin puree has nowhere to go but down. Also, make sure your 60ml of water is truly "ice" water.
Warm water melts the butter, and melted butter leads to a greasy, tough bottom instead of a flaky one.
Why Your Filling Cracked
A crack in the center is almost always a sign of overcooking. When the eggs get too hot, they tighten up and squeeze out moisture, causing the structure to snap. Remember that "carryover cooking" is real. The pie will continue to firm up for at least 30 minutes after you take it out of the oven.
If it looks like Jell O in the very center when you pull it out, it’s actually perfect.
| Problem | Root Cause | Solution |
|---|---|---|
| Dough Crumbles | Too little water/Too cold | Add 1 tsp of water at a time until it holds a ball |
| Shrinking Crust | Dough wasn't rested | Let the dough sit in the fridge for the full 60 mins |
| Custard Bubbles | Oven too hot/Over whisked | Bake at 325°F (165°C) and don't whip air into the eggs |
Common Mistakes Checklist
- ✓ Pat the butter dry if it's been sitting out; moisture on the butter prevents a clean crumble.
- ✓ Use a metal or glass pie dish; ceramic takes longer to heat up and can lead to underdone bottoms.
- ✓ Never skip the 4 hour cooling period; the custard needs time to finish its internal set.
- ✓ Don't over process the dough; stop the moment it starts to look like wet sand.
Smart Swaps and Flavor Twists
If you want to change things up, you can swap the coconut sugar in the crust for light brown sugar for a more traditional molasses flavor. The 12g amount is small enough that it won't drastically change the texture.
For the filling, if you aren't a fan of maple syrup, you can use an equal amount of honey, though honey is a bit sweeter, so you might want to add an extra pinch of salt to balance it.
| Original Ingredient | Substitute | Why It Works |
|---|---|---|
| Maple Syrup (160ml) | Honey (160ml) | Similar viscosity but adds a floral, bright sweetness |
| Coconut Sugar (12g) | Brown Sugar (12g) | Adds a hint of molasses flavor to the pastry |
| Unsalted Butter | Lard (half/half) | Makes the crust even more shattering and flaky |
If you're looking for a shorter path, using a high-quality premade crust is fine, but make sure you still do the blind bake. A store-bought crust is often thinner and more prone to becoming soggy under the 354ml of evaporated milk. If you're hosting a big party, you might want to consider the serving sizes.
| Servings | Pumpkin Puree | Pan Size | Cook Time |
|---|---|---|---|
| 10 People | 425g | 9" Deep Dish | 75 mins |
| 20 People | 850g | Two 9" Deep Dishes | 85 mins (if side-by-side) |
| 5 People | 212g | 7" Tart Pan | 45 mins |
Scaling Success
When scaling this recipe down for a smaller crowd, the egg becomes the tricky part. If you’re doing a half batch, use 2 whole eggs instead of the 3 eggs plus 1 yolk combo. For the 315g of flour, reducing it is straightforward, but keep an eye on your 60ml of water smaller batches of dough dry out faster, so you might need a tiny bit more liquid to get it to clump.
Scaling up is easy, but don't just double the spices. Spices can become overwhelming when doubled. I recommend using 1.5x the amount of cinnamon and ginger if you're making two pies. The 354ml of evaporated milk is easy to double as it usually comes in standard can sizes.
Just remember that two pies in one oven will create more steam, so you might need to add 5-10 minutes to the total bake time to ensure they both set properly.
Keeping Your Slices Fresh Longer
Because of the high moisture content and the eggs, you cannot leave this pie on the counter overnight. Once it has cooled for the 4 hours on the rack, it needs to go into the fridge. I usually wrap mine loosely in foil or plastic wrap. It will stay good for about 3 to 4 days.
If you find the crust is starting to soften, you can pop a slice into a 300°F (150°C) oven for 5 minutes to crisp it back up before serving.
For long term storage, you can freeze it! Wrap the fully cooled pie in two layers of plastic wrap and one layer of foil. It stays great for up to 2 months. To thaw, put it in the fridge 24 hours before you want to eat it.
Don't thaw it on the counter, or you'll get condensation on the surface that ruins the velvety texture of the custard. For zero waste, take those leftover pie crust scraps, sprinkle them with cinnamon and sugar, and bake them for 10 minutes it's the best "cook's treat" while you wait for the main event.
Garnish Ideas for Style
A plain pie is a classic, but a little bit of decoration goes a long way. I love taking the extra dough scraps and using a small leaf shaped cookie cutter to make decorations. Bake them separately for 10-12 minutes and place them around the edge of the pie after it's baked.
It hides any little imperfections or slight shrinking of the main crust.
Whipped cream is the traditional partner here, but try adding a teaspoon of bourbon or a splash of vanilla bean paste to it. The 160ml of maple syrup in the pie already has those deep notes, so the bourbon cream feels like a natural extension.
If you're feeling adventurous, a sprinkle of flaky sea salt right before serving cuts through the richness and makes the 0.5 tsp of nutmeg sing. It’s all about those little touches that make a homemade meal feel special without requiring you to spend all day in the kitchen.
Myths About Pumpkin Pie
Many people believe that fresh pumpkin is always better than canned. In reality, most "fresh" pumpkins sold at the grocery store are Jack o'-lantern style, which are watery and stringy.
Canned puree is actually made from Dickinson pumpkins, which are much creamier and have a more consistent flavor profile for a recipe like this. Unless you are roasting a specific sugar pie pumpkin, stick to the can.
Another common myth is that you need to beat the eggs until they are frothy. Actually, you want to incorporate the eggs as gently as possible. If you whisk too much air into the custard, those air bubbles will rise to the top in the oven and create a bumpy, unsightly surface.
We want a dense, smooth finish, so a gentle hand is much better than a vigorous one. Finally, don't believe the idea that you can't over bake the crust. A burnt crust will make the whole pie taste bitter, so keep a close eye during those last 5 minutes of the blind bake.

Recipe FAQs
What is the secret to a good pumpkin pie?
Bloom your spices in a hot pan. Cooking the pumpkin puree with cinnamon, ginger, nutmeg, cloves, and black pepper for 5 minutes intensifies the aromatic oils, resulting in a much deeper, more concentrated flavor than simply mixing raw ingredients.
Is it better to use heavy cream or evaporated milk in pumpkin pie?
Use low-fat evaporated milk for the best consistency. It provides the right amount of body to the custard without making it overly heavy, allowing the spiced pumpkin profile to remain the star of the show.
What are the ingredients for pumpkin pie?
Gather all-purpose flour, unsalted butter, ice water, sea salt, and coconut sugar for the crust. For the filling, you will need pumpkin puree, 3 large eggs, 1 large egg yolk, low-fat evaporated milk, maple syrup, ground cinnamon, ginger, nutmeg, cloves, and a pinch of black pepper.
Which pie is best for diabetics?
Consult your doctor or nutritionist regarding specific dietary needs. This recipe uses maple syrup and coconut sugar, which are still forms of sugar, so it is important to assess whether it fits into your personal health plan.
How to prevent the pie crust from getting soggy?
Blind bake the crust first at 375°F for 15 minutes with weights. Afterward, remove the weights, brush the dough with a thin layer of egg white, and bake for an additional 5 minutes to create an effective moisture barrier before adding the filling.
How to achieve a perfectly silky custard texture?
Temper the eggs by whisking in a small amount of the warm pumpkin mixture before combining everything. This prevents the eggs from scrambling and ensures a smooth, consistent base. If you enjoyed mastering this tempering technique here, see how we use similar principles to create the sauce in our baked cod recipe.
How to tell when the pumpkin pie is finished baking?
Look for set edges while the center retains a slight jiggle. After baking at 325°F for 50-60 minutes, the pie must cool completely on a wire rack for at least 4 hours to finish setting into the ideal texture.
Classic Homemade Pumpkin Pie

Ingredients:
Instructions:
Nutrition Facts:
| Calories | 408 kcal |
|---|---|
| Protein | 8.5 g |
| Fat | 21.1 g |
| Carbs | 45.5 g |
| Fiber | 1.8 g |
| Sugar | 17.9 g |
| Sodium | 252 mg |
