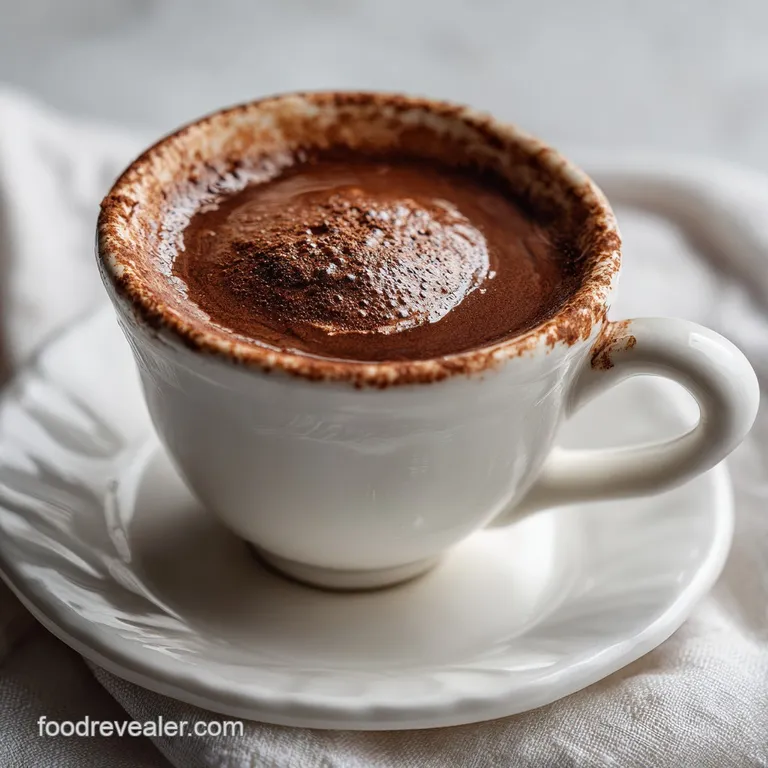
Velvety Hot Chocolate: Creamy and Rich
- Time: Active 5 minutes, Passive 10 minutes, Total 15 minutes
- Flavor/Texture Hook: Velvety, molten, and intensely fudgy
- Perfect for: Festive weekend brunches and holiday hosting
- The Secret to Crafting a Velvety Hot Chocolate Recipe
- Essential Specs for Your Next Festive Brunch Celebration
- Selecting the Finest Elements for Chocolate Recipe Perfection
- The Essential Tools for a Silky Smooth Finish
- Mastering the Technique for This Luxurious Hot Chocolate Recipe
- Solving Common Textural Issues for the Perfect Pour
- Creative Flavor Twists to Match Any Festive Mood
- Keeping Your Cocoa Fresh and Reducing Kitchen Waste
- Hosting Tips and Pairings for a Celebratory Spread
- Recipe FAQs
- 📝 Recipe Card
The Secret to Crafting a Velvety Hot Chocolate Recipe
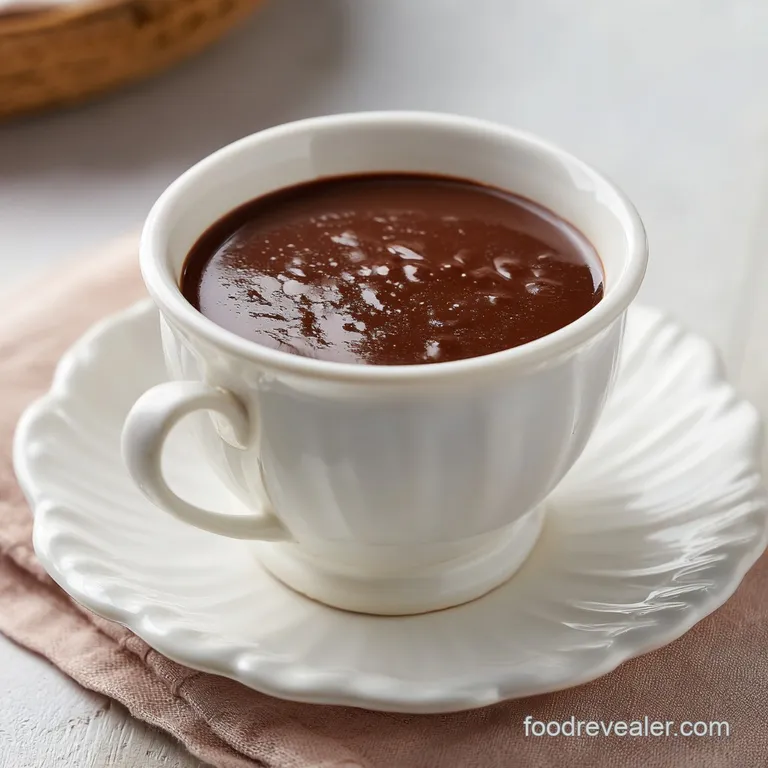
Imagine the kitchen on a slow Sunday morning, the air thick with the scent of darkening sugar and toasted cacao. There is a specific sound when you whisk real chocolate into warm milk a soft, rhythmic splashing that slowly thickens into a heavy, rhythmic swirl.
Most people settle for those thin, watery packets that leave a chalky residue at the bottom of the mug, but we are looking for something that feels like a liquid hug. This hot chocolate recipe isn't just a drink; it is a centerpiece for a celebratory brunch, designed to be sipped slowly while the steam carries notes of vanilla and sea salt across the table.
The absolute hero of this entire experience is the 2 oz of high-quality semi sweet chocolate. While the cocoa powder provides the foundational "dark" flavor, it's the cocoa butter within the solid chocolate bar that creates that signature velvety mouthfeel.
When you chop a real bar, you get these tiny shards and "chocolate dust" that melt at different rates, essentially tempering themselves into the milk. I’ve tried using just powder, and honestly, it feels hollow. It’s like listening to a song with no bass.
The solid chocolate adds that necessary weight and a glossy sheen that reflects the light from your holiday candles.
When I first started hosting festive gatherings, I realized that the best drinks are the ones that balance indulgence with a bit of brightness. We aren't just making a sugary mess here; we are balancing the fat from the 1/4 cup of heavy cream against the bitterness of the unsweetened cocoa. It’s a delicate dance.
If you’ve ever had a cup that felt too cloying or "one note," it was likely missing that crucial pinch of fine sea salt. Salt is the secret weapon that unlocks the fruitier notes of the cacao bean, making the whole experience feel sophisticated rather than just sweet.
Essential Specs for Your Next Festive Brunch Celebration
Planning a gathering requires a bit of logistical precision, especially when you want to keep things breezy and fun. This recipe is specifically designed to yield two generous servings, making it easy to scale up for a larger crowd without losing the integrity of the emulsion.
If you are hosting a larger group, you can easily double or triple the quantities, provided you have a large enough heavy bottomed saucepan to prevent scorching. The goal is to keep the liquid hot but never allow it to reach a rolling boil, which can separate the fats and leave you with a greasy film.
- Mechanism
- The "Slurry" Method prevents dry cocoa particles from clumping by hydrating them in a small amount of liquid before adding the bulk of the milk.
- Mechanism
- Fat Emulsification occurs as the whisking action suspends the cocoa butter from the chopped chocolate into the whole milk and heavy cream.
- Mechanism
- Temperature Control keeps the proteins in the milk from denaturing and creating a "skin" on top of your drink.
- Mechanism
- Flavor Amplification happens when the vanilla and salt interact with the heated chocolate solids to reduce perceived bitterness.
| Servings | Milk Amount | Chocolate Amount | Cook Time | Visual Cue |
|---|---|---|---|---|
| 2 People | 2 cups | 2 oz | 10 minutes | Steam rises, chocolate fully melted |
| 4 People | 4 cups | 4 oz | 12 minutes | Small bubbles at the edge of the pan |
| 6 People | 6 cups | 6 oz | 15 minutes | Liquid coats the back of a spoon |
When you are setting your brunch table, remember that the visual presentation is just as important as the taste. This is where we focus on color balance to make the mugs look like something out of a high end magazine. I like to think in terms of three specific color accents.
First, the snowy white of a toasted marshmallow or a dollop of whipped cream. Second, a pop of bright red perhaps a few fresh raspberries or pomegranate seeds dropped on top. Third, a sliver of deep green, like a fresh mint sprig.
Adding these accents at the very last second, right before the mugs hit the table, keeps the colors vibrant and prevents them from sinking into the dark chocolate depths.
Selecting the Finest Elements for Chocolate Recipe Perfection
| Ingredient | Science Role | Pro Secret |
|---|---|---|
| Semi Sweet Chocolate | Provides cocoa butter for viscosity | Chop it into "shards" rather than chunks for a faster, more even melt. |
| Unsweetened Cocoa | Delivers concentrated chocolate flavor | Use Dutch processed cocoa for a darker color and smoother, less acidic finish. |
| Heavy Cream | Increases fat content for "clinging" texture | Never skip this; it provides the structural richness that milk alone lacks. |
| Fine Sea Salt | Enhances sweetness perception | A tiny pinch suppresses bitterness and makes the chocolate taste "more like itself." |
For the chocolate base, I always reach for a bar with at least 60% cacao. Using chocolate chips is a common shortcut, but they often contain stabilizers that prevent them from melting into a perfectly smooth liquid. A real bar, roughly chopped, will give you a much more luxurious result.
If you find yourself in a pinch and need a different profile, consider how the sugar content will shift.
- 3 tbsp unsweetened cocoa powder: Why this? Provides the deep, dark chocolate backbone without adding extra fat or sugar. Substitute: Cacao powder (slightly more bitter and earthy).
- 2 oz semi sweet chocolate: Why this? Adds the necessary cocoa butter for that velvety, rich mouthfeel. Substitute: Bittersweet chocolate (add 1 tsp extra sugar to compensate).
- 3 tbsp granulated sugar: Why this? Just enough to balance the bitterness of the cocoa. Substitute: Maple syrup (adds a woody, autumnal note).
- 2 cups whole milk: Why this? The ideal protein and fat balance for a creamy liquid base. Substitute: Oat milk (use the "Barista" version for similar thickness).
- 1/4 cup heavy cream: Why this? Adds decadent body and a luxurious coating on the tongue. Substitute: Coconut cream (adds a subtle tropical flavor).
- 1/2 tsp pure vanilla extract: Why this? Acts as a floral bridge between the sugar and the chocolate. Substitute: Almond extract (use only 1/8 tsp as it's very strong).
- 1 pinch fine sea salt: Why this? Essential for cutting through the richness and highlighting the cacao. Substitute: Pink Himalayan salt.
For a fun pairing during a celebratory morning, this drink goes beautifully with a slice of Fudgy Chocolate Chip Banana Bread. The density of the bread mimics the richness of the drink, creating a double chocolate experience that feels truly indulgent. If you're hosting a crowd, having a loaf of that bread sliced on a wooden board next to the stove is a total hosting win.
The Essential Tools for a Silky Smooth Finish
You don't need a professional kitchen, but a few specific tools will make your life much easier. The most important is a small heavy bottomed saucepan. This ensures even heat distribution so the milk at the bottom doesn't scorch while the rest is still warming up.
A thin, cheap pan is the enemy of a good chocolate recipe; it creates "hot spots" that can burn the sugar and ruin the flavor of the cocoa.
Chef's Tip: Use a silicone coated whisk if you are using a non stick pan to avoid scratching the surface, but ensure the whisk has plenty of wires to break up those cocoa lumps efficiently.
Next, have a fine mesh sieve ready. This might seem like an extra step, but pouring the finished liquid through a sieve into your mugs catches any stray bits of unmelted chocolate or cocoa clumps. It is the difference between a "good" home cook and someone who looks like they have a secret culinary degree.
Finally,, I always recommend using a sharp chef's knife for the chocolate. A dull knife will make the chocolate "shatter" in unpredictable ways, whereas a sharp blade allows you to create that fine chocolate dust that incorporates into the milk almost instantly.
Mastering the Technique for This Luxurious Hot Chocolate Recipe
- In a small heavy bottomed saucepan, whisk together the 3 tbsp cocoa powder, 3 tbsp sugar, and fine sea salt until lumps are broken up. Note: Doing this while dry makes it much easier to eliminate clumps later.
- Add 2 tablespoons of the whole milk to the dry ingredients and stir vigorously to create a concentrated, smooth chocolate slurry. Note: This is the most important step for a grit free texture.
- Gradually pour in the remaining whole milk and the 1/4 cup heavy cream while whisking constantly over medium low heat.
- Add the 2 oz of chopped semi sweet chocolate and continue whisking until the chocolate is fully melted and the liquid is hot, but not boiling. This should take about 10 minutes of gentle heat.
- Check the temperature it should be around 75°C (167°F). You should see steady steam and tiny bubbles at the edges.
- Remove from heat immediately to prevent the milk from developing a film or "skin" on the surface.
- Stir in the 1/2 tsp vanilla extract. Note: Adding vanilla at the end preserves its delicate floral aroma which can evaporate under high heat.
- Pour the mixture through a fine mesh sieve into two mugs until the liquid is perfectly glossy and smooth.
- Garnish with your chosen color accents marshmallows, raspberries, or mint and serve immediately while the froth is still active.
While this stovetop method is classic, if you're looking for something even more playful for a dessert focused brunch, you could serve these alongside some Smores Whoopie Pies. The toasted marshmallow filling in the pies echoes the flavors of the hot chocolate perfectly, making the whole spread feel like a cohesive celebration. It's these little thematic touches that really make your hosting stand out.
Solving Common Textural Issues for the Perfect Pour
Even with the best intentions, things can go sideways in the kitchen. The most common heartbreak is a "gritty" texture. This usually happens for two reasons: either the cocoa powder wasn't fully hydrated in the slurry step, or the chocolate you used contained too many stabilizers.
If you find your drink is a bit grainy, don't panic. You can often save it by pouring it back into the blender (be careful with hot liquids!) and giving it a quick 10 second pulse. This mechanically breaks down any stubborn particles and creates a beautiful froth on top.
Preventing Gritty Texture
The slurry is your insurance policy. If you skip the "2 tablespoons of milk" step and just dump all the milk in at once, the cocoa powder will form hydrophobic "bubbles" that are nearly impossible to pop. This leads to a drink that looks smooth but feels sandy on the tongue.
Always spend that extra 30 seconds whisking the thick paste before adding the rest of your liquid.
Rescuing Scorched Milk
If you see brown bits floating in your milk or smell a slight "toasted" scent that isn't chocolate, you've likely scorched the bottom. If it's just a little bit, do not scrape the bottom of the pan! Carefully pour the "good" liquid into a fresh pot, leaving the burnt bits behind.
If the burnt flavor has permeated the whole batch, unfortunately, it's best to start over. Chocolate is a delicate flavor and easily masked by the bitterness of burnt milk.
| Problem | Root Cause | Solution |
|---|---|---|
| Grainy Mouthfeel | Incomplete slurry hydration | Pulse in a blender for 10 seconds or use a milk frother. |
| Thin/Watery Body | low-fat content in milk | Stir in an extra tablespoon of heavy cream or a pat of butter. |
| Oily Film on Top | Liquid reached a rolling boil | Remove from heat and whisk vigorously to re emulsify the fats. |
Common Mistakes Checklist:
- ✓ Forgot to whisk the dry ingredients first (results in lumps).
- ✓ Using "cold" chocolate chunks (they take too long to melt; chop them fine!).
- ✓ Boiling the milk (this ruins the creamy texture and changes the flavor).
- ✓ Using low-fat or skim milk without adding extra cream (the drink will feel "thin").
- ✓ Adding vanilla too early (the heat destroys the subtle flavor notes).
Creative Flavor Twists to Match Any Festive Mood
Once you have the base down, the variations are endless. For a larger brunch gathering, I love setting up a "Cocoa Bar" where guests can customize their own mugs. You can provide different liqueurs, spices, and toppings.
If you're scaling down for a quiet morning, you can infuse the milk with different flavors while it heats up.
- DOWN (1 serving): Use 1 cup milk, 2 tbsp cream, 1.5 tbsp cocoa, 1 oz chocolate. Use a very small butter warmer pot to keep the volume high enough for whisking.
- UP (4-8 servings): Double the ingredients. Increase salt and spices to 1.5x only to avoid overpowering the chocolate.
- Baking Application: If using this as a base for a cake soak, reduce the milk by half to create a thicker "syrup" consistency.
| Fresh Method | Shortcut (Packet) | Flavor Impact |
|---|---|---|
| Chopped Chocolate Bar | Cocoa Powder Mix | Fresh has a much richer, "lingering" chocolate finish. |
| Whole Milk + Cream | Water or Skim Milk | Fresh provides a "velvety" coating; shortcut feels "thin" or "watery". |
| Real Vanilla Extract | Artificial Flavoring | Fresh adds floral complexity; shortcut can taste "medicinal". |
Infusing Spicy Mexican Notes
Add 1/4 tsp of ground cinnamon and a tiny pinch of cayenne pepper to the dry ingredients. The heat from the cayenne isn't meant to be "spicy," but rather to provide a subtle warmth that hits the back of your throat, perfectly mimicking a traditional Mexican hot chocolate.
Creating a Peppermint Twist
Instead of vanilla, use 1/4 tsp of peppermint extract. Garnish with a crushed candy cane. The contrast between the cool mint and the molten chocolate is a classic for a reason it’s refreshing and indulgent all at once.
Keeping Your Cocoa Fresh and Reducing Kitchen Waste
If you find yourself with leftovers which is rare, but it happens! don't even think about pouring it down the drain. This liquid gold can be repurposed in so many creative ways. You can store the cooled hot chocolate in an airtight jar in the fridge for up to 3 days.
When you're ready to enjoy it again, reheat it gently on the stove over low heat. Do not use the microwave if you can avoid it, as it tends to heat unevenly and can cause the cream to "pop" and separate.
For a zero waste hack, if you have just a half cup left, pour it into an ice cube tray and freeze it. These "chocolate cubes" are incredible dropped into your morning coffee for an instant mocha that doesn't get watered down.
If you have the cocoa powder dregs or the "dust" from chopping the chocolate, save those in a small container to sprinkle over yogurt or oatmeal the next morning.
- Fridge
- Up to 3 days in a sealed glass jar. Whisk well after reheating.
- Freezer
- Up to 2 months. Freeze in silicone molds for easy portioning.
- Zero Waste
- Use leftover liquid as a base for a chocolate smoothie or a French toast soak.
Hosting Tips and Pairings for a Celebratory Spread
When you're hosting a festive brunch, the hot chocolate should feel like an event. I like to serve it in clear glass mugs so guests can see the deep, rich color and the way the marshmallows slowly melt into the surface.
Place the mugs on a tray with a few extra chocolate shavings and a small bowl of those raspberries we talked about for that color balance.
If you want a thicker drink, add more chopped chocolate.If you want a lighter drink, replace the heavy cream with more whole milk.If you want a frothier top, use a handheld milk frother for 30 seconds before serving.
Myths about hot chocolate abound, but the biggest one is that you need "expensive" equipment. You don't. You just need patience and a good whisk. Another myth is that the "skin" on top of the milk is inevitable.
It’s actually caused by evaporation; if you keep your heat low and whisk frequently, you can prevent it entirely. Finally,, many people think you can't use water. You can, but it fundamentally changes the drink from a "rich hot chocolate" to a "hot cocoa," which is much thinner.
For a celebration, always go for the dairy (or a high fat plant alternative). Trust me, your guests will notice the difference the moment that velvety liquid hits their lips. It's the ultimate way to turn a simple morning into a true celebration.

Recipe FAQs
How to make a really good hot chocolate?
Whisk a smooth slurry first. Combine your cocoa powder, sugar, and salt with just 2 tablespoons of whole milk before adding the rest of the liquid to ensure there are zero dry clumps. If you enjoyed mastering this emulsification technique, you can apply the same principle to our simple vanilla cupcakes for a perfectly stable batter.
How do I make a hot cup of cocoa?
Combine cocoa powder, sugar, and salt in a saucepan, then gradually whisk in the milk and cream over medium low heat. Once the liquid is hot, stir in your chopped semi sweet chocolate and vanilla extract until the mixture is uniform and silky.
Is hot chocolate ok for diabetics?
No, this recipe contains sugar and milk, which will impact blood glucose levels. Please consult your healthcare provider or a registered dietitian before including this drink in your meal plan.
Can lactose intolerant drink hot chocolate?
No, the traditional recipe uses whole milk and heavy cream. Both ingredients contain lactose, which will likely cause a reaction for those with sensitivities.
How to prevent hot chocolate from being grainy?
Pour the finished drink through a fine mesh sieve into your mug. This catches any tiny bits of undissolved cocoa or chocolate that might have survived the whisking process, guaranteeing a velvety finish.
Is it true I should let the milk boil to get a better flavor?
False, this is a common misconception. Boiling the milk can scorch the dairy and ruin the texture; keep the heat on medium low and stop once the chocolate is fully melted and the drink is hot.
How to store the dry ingredients for later?
Whisk the cocoa powder, sugar, and sea salt together and keep them in an airtight container for up to one month. When you are ready to serve, simply whisk this pre-mixed base with your milk and cream on the stovetop.
Creamy Stove Top Hot Chocolate
Ingredients:
Instructions:
Nutrition Facts:
| Calories | 499 kcal |
|---|---|
| Protein | 11.3 g |
| Fat | 29.8 g |
| Carbs | 50.7 g |
| Fiber | 4.5 g |
| Sugar | 43.7 g |
| Sodium | 158 mg |
